Wednesday, November 21, 2007

The backyard part deux


This is the reverse view - looking from the SE towards the NW. The paths are wide enough for two people to walk abreast, though that width may decrease as the plants become more established. You can also see the "island" bed in the upper left corner. We planted a fuyu persimmon for Deb and Vic (who helped me plant it) and Dan/Noa/Luca/Enzo. This shot also illustrates our affinity for contrasting foliage, specifically those with yellow or purple foliage. We promise to update the garden photos come spring when things have grown.

The backyard


This view is looking from the NW corner towards the SE corner. You can see a fig leaf, part of the pear-apple tree, a blueberry twig, many herbs and a few varieties of drought-tolerant grasses. Also visible are the gravel paths, which were dug out with the help of Rachael's student Caitlyn. This is the same type of 1/4"- unsorted gravel used in traditional Japanese gardens. It compacts nicely and doesn't migrate into the house, all the while allowing water to permeate.

Sunday, September 9, 2007

Landing 1.0


We've established our own language for talking about certain, easily-confused areas of the house. For instance, we refer to the stairwell landings as .5, 1.0 and 1.5 (the landing between the basement and first floors, the first floor, and between the first and second floors, respectively.) The 1.0 landing includes a broom closet and mail sorting center. We stole the last idea from Sarah Susanka's Not So Big House series. We used to sort our mail and drop our things in the kitchen, a practice that added to the clutter of the area. We now sort our mail, post important items, store letters and reference papers and the like at the sorting center.

The sorting center is comprised of an old school desk (formerly my sewing table). It's located near the back door and above the basement, which also has a entry. We intend to use this basement side-access door as our primary entry in the winter as the basement is spacious and has an unimproved concrete floor which will be great for muddy boats and wet coats. We can drop off our papers and mail as we pass the sorting center on the way up the stairs. It's all about location!

Switchplates and Switchplate Covers


Adding to our modern aesthetic are our Cooper Lighting "Aspire" series light switches and switchplate covers. The large rocker-type switches are easy to find and use, even in the dark. Certain switches are illuminated and/or dimmable. We tried to gang them up when possible to avoid too much "wall acne." The covers are sleek and streamlined and are made of flexible, crack-resistant grey plastic that looks like unpolished metal.

Bathroom Hardware


A remodel can be roughly split into big projects (demolition, framing, systems, cabinets, flooring etc.) and less-big projects (painting, door hardware, switch plate covers and so on.) There are no small projects, especially as you reach the point of burnout. Every job seems enormous, and every achievement monumental. One such example can be found in our downstairs bathroom. Just recently have we (Rude with some help from Justin) installed accessories like towel racks, a toilet paper holder, a mirror and even a few photographs on the wall. It's little things like this that make the house feel lived in.

House Numbers


We chose dark bronze house numbers that match our roof and gutters. They are art-deco in style and a vast improvement over the previous broken wooden numbers. We're unsure of the font name. Guesses?

Gutters and Bioswale Plans


Our dark bronze gutters (seen from above at bottom of photo) match our roof perfectly. We sprung for gutter covers, a good idea given the myriad large trees surrounding our property. Rachael was squeamish about the idea of Justin having to clean the second-story gutters each year.

Three of the four downspouts empty on to the East side (i.e. front) of our property. Our plan is excavate a large portion of the sidewalk-less easement in order to create a natural bioswale into which the stormwater can flow. We've already begun to collect water-loving plants to install in this wetlands-like natural drainage and filtering system. The city offers tax credits for this sort of project due to the prevalence of wintertime Combined Sewer Overflows (CSOs). These occur due to Portland's antiquated sewer system; All gray and black water (household water waste) is combined with the runoff from houses and streets into one large system. When the system reaches maximum capacity, surplus is dumped into the Willamette River. This means that, in the rainy months, biological and chemical waste enters the river nearly daily. Diverting the rainwater to permeable locations such as a bioswale helps to reduce the amount of water entering our pipes and, thus, the frequency of CSOs.

Concrete Countertops


Ah, Rude. How could we have done this remodel with out you? (Answer: We couldn't.) Not only are you a tile-laying master, but also a master of concrete. Our countertops and slate backsplash (leftovers from the floor) have turned out even better than we'd imagined.

Basement Bedroom, Repainted


Roy (Rachael's youthful dad) pointed out that dark brown was, perhaps, too dreary for a basement bedroom. We opted to paint the bedroom a warm cream color with two wall segments a pear-green. It really lightened up the room and made it feel more spacious. We may add a few more green accent walls down the line.

Pause...

An apology to our loyal readers: we burnt out. After a year and some change of planning and executing the remodel, we (and our weary bodies) needed a break. We declared August 11th our official "first day of summer break" and have regulated ourselves to optional, not obligatory, projects ever since. This has allowed Rachael to garden, Justin to fine tune, and both of us to enjoy some late-night barbecues, Rachael's 10-year reunion, visits with Luca and Enzo and Zoe and Maraena, some lazy days blueberry picking and, of course, the all-important PDX Adult Soapbox Derby. We're relishing reconnecting with our community, and are off to a great start to the school year. Meanwhile, look for updated posts in the days ahead.

Wednesday, July 18, 2007

Loose Ends


We're starting to come up on the end of the remodel (at least the major pieces of it, anyway), and a lot of unfinished projects are starting to wrap up. The second half of the rock steps went in tonight with Carlos's help. Now that the stone is in place, Rachael is going to fill in the gaps with rich soil and plant ground cover, which will hopefully help the rocks blend in with the existing dirt and rock walls to either side.

Great Northwest Gutters installed our gutters and downspouts earlier this week and did some excellent work. The stock brown of the gutters matches the roof so well that they're practically invisible against the house. We chose downspout locations so that we can feed water runoff into small bioswales/watersheds instead of into the storm drains in the street.

Chano and crew have been doing a lot of painting, staining and varnishing for us, and it's all really starting to come together now. In this photo you can see the unexpectedly delicious finish of the porch ceiling, which is stained a deep brown and varnished.

Bull Nose


Rude came by and framed in the window and top edge of the bathroom field tile with bull nose pieces. He did a little creative maneuvering and put in a slate windowsill and did some crazy tile cutting work around the window. This photo doesn't do it justice, but if you saw it in person, you'd be excusing yourself more frequently to use the bathroom.

Water Bead


This shot was taken this afternoon. We got a pretty heavy rainstorm last night and the water that hit the deck beaded up on the layer of sealer instead of soaking into the wood.

Freshness Seal

Here's a shot of the deck during the sealing process. There's an unfinished strip running right to left in the center of the photo. The sealer brings out the rich grain and color of the Ipe and helps keep the deck from graying too quickly.

Backbreaking


On Saturday, Stuart and I moved over a ton and a half of rock into place for the lower set of front stairs. We spent a great deal of time shoveling dirt and gravel, too. Add to that a nasty fight or twelve with some tree roots the size of our forearms (or maybe the forearm of Loki, Stu?), and we had ourselves a mammoth day. Rachael kept things interesting when she disturbed a yellow jacket nest and collected three stings, including one right on her eyebrow.

Freakishly coincidentally, the Neander Games were held this past weekend at Rocky Butte in northeast Portland.

The plastic hanging over the porch was to keep falling tree debris off the freshly sealed decking.

Matching Garage


Chano, Leo and Carlos were with us again Saturday, this time putting some fresh paint on the garage to match it to the house.

Power Wash


Last Friday night Justin power washed the deck. Rachael scrubbed it clean with a stiff bristled push broom and some deck cleaner/brightener/conditioner. Then Justin power rinsed it clean. Thanks, Nathan for loaning us your washer. We filled the tank with diesel for you (just kidding!).

Tuesday, July 10, 2007

Stair Stone


Smith Rock (the stone retailer in Portland, not the climber's destination in Bend) dropped off one and a half tons of gray Oregon basalt curbstone. The average stone is about seven inches high, ten inches wide and twenty inches deep. We'll spend this weekend arranging and setting them in that dirt runout peeking out from behind the pallet. The project will require some excavation to level things out and we'll use 3/4 inch minus to backfill the rock beds.

Black Gold


Rachael and Grimm's Fuel spent a couple of hot hours this afternoon (it reached 104 F in the 'hood today) blowing in four inches of new soil, covering the entire back yard, side yard and some areas in the front yard.

Trim Paint


Chano and Leo pack up after another long evening of painting. Tonight they worked on soffit and trim. The soffit stain is coming out darker than we expected, but we like the look so far.

In case we haven't mentioned it, our neighbors to the north cut down their laurel hedge a few weeks ago, and now our north side is really exposed. They say their plan is to put in a new wooden fence along the property line this summer, which will provide a nice gardening backdrop for the planting strip along the driveway.

Here's a shot from about the same spot before the hedge was cut down.

Sunday, July 8, 2007

Outside Green


Chano and his crew returned today to put two coats of Cushing Green on the siding. At last, a uniform color for the whole house. We chose this green for many reasons. We've been collecting photos of houses with comparable color schemes. It's a fairly popular tone in Portland - sage or mossy green. We didn't want anything resembling the interior greens of our house pre-remodel (for a reminder, click here.) It's a medium-toned color, neither too dark nor too light. We've read that light colors age quickly due to dirt and stains, and that dark colors age due to fading. Our Powell Paint friends employ a great "color consultant" who helped us to narrow our scope.

Tomorrow they'll return to finish with the trim colors which include marble white, a creamier version of the original, and a brown that resembles the ipe for an accent color. They'll also stain the soffit a similar brown.

Primer 2


Here's a backyard view of the primed house.

Primer 1


On Saturday Chano's crew taped off all non-siding parts of the house, including windows, doors, some roof sections, and decking. They even put plastic over our car and truck to protect them from overspray. The taping took hours. The spray application of primer took a fraction of that.

Stair Nose


Don came by last Tuesday and Wednesday and helped with bamboo stair treads and some finer finish work like these stair nose cuts. Don's been working in floor finishings for years and his skills produced some professional results. Thanks Don!

Thursday, July 5, 2007

Backyard Conditioning


Rachael and Hannah have spent a lot of time working on the back yard, getting it ready for planting next year. All this corrugated cardboard is from the numerous materials and appliances we've been bringing to the house. Instead of recycling it, we're using it kill the grass, after which it will naturally compost into the yard. We spread straw (not hay, which has seeds) around on the bare earth areas to reduce mud and sawdust migration into the house. In late June we were still having periodic rain and it was making a real mess of the place. The straw works out great: it's soft to walk on, keeps the mud down, provides cavities into which the sawdust to can fall (below shoe-sole level), and gives an overall cleaner look to yard.

This coming Tuesday, Rachael will oversee the dispersion of 15 cubic yards of new soil. The soil, which is a mix of organic mulch, sandy loam (a medium-smallish sediment), topsoil and manure, will be blown in by Grimm's Fuel. 15 cubic yards is a LOT of soil - 15 truckloads (in Rach's little Nissan) worth. Having it blown in will save Rachael a few days worth of backbreaking hauling.

Front Stairs


The upper set of front porch stairs are almost done. The lower set of stairs, which will be out of the photo to the left, will be rock construction. More on that later this week after the stone is delivered.

Bamboo Treads


The interior stairwell to the second floor is pushing forward. After this shot was taken, Jason installed trim around the landing baseboard. We still need to finish a few lower steps (down and to the left in this photo) and the basement stairs still need risers and treads. Next week we'll hopefully have the railing and bannister posts in.

Thursday, June 28, 2007

Island Layout


Rude came by yesterday and today to lay out the pattern for the island. We played around with a couple of designs and we've come up with what is turning out to be one heck of a master- slash center-piece in the kitchen. We won't see the results for a few weeks since it takes that long for the concrete to set and cure, but the final product is going to be anything but a drab counter top and we're twitching with excitement about it.

High Spout


Of the many appliances and fixtures, The sink/faucet/garbage disposal is perhaps Rachael's favorite trio! (It may be that she really disliked washing dishes in the bathtub or utility sink...)

This sink is large enough to hold a cookie sheet laying flat, it's chip and scratch proof and is actually really light despite the size (this helped with installation.) We have a mini-Tupperware container that stays in the sink for the occasions when a large sink full of hot soapy water is overkill. (Dad.) The sink will be under mounted beneath the concrete countertops.

The garbage disposal (an "InSinkerator") is a food-waste pulverizing monster, yet completely silent. Well, not COMPLETELY silent. We wanted an appliance that did its job (grind up non-compostable food matter) quietly while still rumbling loudly enough to dissuade adventurous 3 year olds, from trying to save the castoffs of their purple cauliflower.

The amazing faucet sits in such a way that it demands attention. We wanted a tall, largely arched faucet to better enable us to fill pots and pans with water, or to rinse them clean. The water power coming from the faucet is amazing, and a set of buttons lets you alternate between a spray version and the more typical single stream. The head of the faucet pulls down out of the neck on a hidden hose and extends a few feet, allowing for easier access to the distant corners of this seriously gargantuan sink. We chose the faucet not only for the phenomenal function, but for the form as well. It seems to mimic the shape of the necks of the Canadian geese that live across the street in Crystal Springs.

Xenon


These under-cabinet light fixtures have Xenon bulbs, which are both relatively low energy and cast a warmer glow than other low-energy bulbs (such as fluorescent). The bulbs run at line voltage (110v), which means we can put them on dimmers. The conduit connecting the lights is required since exposed romex in a living space is against code, but we'll be able to hide some of it with backsplash and paint. This is a low-angle shot you normally wouldn't have if standing in the kitchen, and you really need to stoop down to to see the fixtures.

Urban Flamingo


This lovely Great Blue Heron perches just outside our bedroom window, about 50 feet up this conifer. Yesterday he stayed well into the day, perhaps content with the knowledge that he was
a. beautiful (the humans at our residence want nothing more than to gawk) and
b. freaking huge! His wingspan must be at least six feet long. This guy could take the raccoon (living in the next tree over, as verified in previous posts) head on. We hope that he doesn't, but instead continues to make his home in direct view of ours.

Herringbone


The main decking, stair treads and riser boards are finally in, and the deck looks gorgeous. Instead of 45-degree miter joints, which we've largely tried to avoid in this entire project since we harbor a semi-extreme dislike of them, we're using a herringbone pattern at all of the deck corners. This has been some tedious work for Green Hammer, not only because it's finish work but because the Ipe ironwood is pretty difficult to work with. We posted about the excellently tough construction properties of Ipe in an earlier post.

Light Commercial


We're using Schlage's S-Series line of light commercial UL-Listed security hardware for all interior doors. The commercial grade stuff isn't any more expensive than the residential door hardware (and less expensive in some cases), and it's going to last much, much longer. We used medium duty commercial grade Trans-Atlantic levers and Schlage deadbolts with reinforced latches and locks on the exterior doors. The lever action on the commercial gear is oh so smooth.

Foot Model Global Winner!


Here Karen is seen striking a pose on our new FLOR. FLOR is basically 20" x 20" segments of carpet that are sold in a variety of textures and colors. They are made of recycled materials and are very durable. You can attach the squares in any formation you'd like, and switch them up as frequently as you please. If one square (our many squares have been stickied together to form a larger carpet) gets dingy, you simply replace it with another. The old one is recycled and the cycle continues. Note to friends: Please aim for the gray square when spilling red wine (cola, prune juice, coffee, whatever...) I fear for the longevity of the lone orange square.

Justin liked my pattern. Very binary, I think he said.

Door Trim


Jason has been visiting us on evenings and weekends, installing cabinets and trim. This past weekend he got through most of the first floor and put trim around most of the door frames. We're going with a pseudo post and lintel style trim cut, which is easier to cut and has a classier look (IOHOs). We finished the trim boards with Benite wood conditioner and then a light stain. The result is a perfect match to the bamboo floors.

This photo is of the first floor bathroom door. The door isn't finished yet since we haven't decided what to do with it, but the bathroom needs privacy. We'll take the door down and refinish it later.

Risers and Skirting


Last weekend our good friend Dave and his business associates Deacon and Bill traveled from Bend to install the bamboo stairs. They discovered that the stair nose wasn't right for our stair treads so were only able to complete the risers (the stair face boards) and skirting (the boards that run alongside the stair). They made fast work of some complex cuts, however. Thanks, guys!

Monday, June 25, 2007

Rachael's First Attempt at Detail Work


Justin and I have had distinct roles in this remodel: He is the detail guy and visionary, I am the grunt labor and accountant. Needless to say, I'm envious of his side of the bargain. The problem is, I simply don't have the skills (yet) to do much of what he does, and a remodel of this scale is not the place to practice. Thus I'm self-regulated to lugging, recycling, cleaning, feeding, managing and the like. I should note that Justin is always most encouraging of me and my attempts to master any new skill.

Above is a shot of my first foray into the realm of detail work. I had a template which was surprisingly unhelpful as the holes were far larger than the drill bit. I still had to choose where in the hole (i.e. upper right quadrant) I was going to drill and draw a dot to guide me. I was, in fact, so hyper-focused in my attempts to get everything just right (as Justin always seems to) that I had forgotten that we'd agreed that we were going to position all of the handles horizontally, and inadvertently drilled the first door holes vertically. It ended up for the better as we realized that the vertical handles on doors (we'll still do horizontal on drawers) allow for maximum opening of the upper cabinets.

The design of the drawer pulls is found in many other areas of our house, notably light fixtures. We chose these as they were both geometric and simple. And on sale.
  • 6/27 :: Daniel adds : We used almost identical pulls in our kitchen - with vertical alignment for the cabinet doors and horizontal for the drawers. I made a template out of a spare piece of 1x4. The best thing to do is to make sure to CLAMP the template down - also, put blue tape on the cabinet door back (always drill front to back) to keep the drill bit from splintering the back of your cabinets.
  • 6/28 :: Hannah adds : i'm so proud of you!

Friday, June 22, 2007

Engineering Marvel


Here's the nearly completed modified downdraft blower. It started out a rectangular box. After marking, cutting, snipping, bending, drilling, riveting and screwing, it's now a cube.

Pop Rivet


Nick pops a rivet into the (extremely) modified housing of the remote blower for the kitchen cooktop downdraft unit. The downdraft and blower are two separate appliances connected together by ductwork. The downdraft is installed behind the cooktop and is flush with the countertop when it's turned off. When it's on, it'll come up out of the counter to a height of about 7 inches. The remote blower will activate simultaneously and pull 800 cubic feet of air per minute across the top of the cooktop, through the downdraft and ductwork and out of the house, keeping grease off the ceiling and rapidly evacuating steam and smoke from the first floor airspace.

We'll mount the blower remotely on the ceiling of the basement (about 7 feet of duct downline from the downdraft). That it's a remote unit means that it's in another room downstairs and we won't have to listen to a noisy fan in the kitchen. The blower suction is a squirrel cage design (as opposed to a bladed fan normally used in overhead vents), making it very quiet.

The blower was originally about the size of a window-fitted air conditioner, and shipped too large to conveniently fit anywhere in the basement utility room without creating a huge and unsightly obstacle. A lot of engineering went into cutting down the walls by a few inches so that it will fit into the bay between our basement ceiling joists, getting it up out of the way. Thanks Nick for your hands-on help and science (and for helping void the warranty, even though it should be extended). Thanks Bo for the tool loan, and thanks to the guys at Do It Yourself Heating for all the wacky duct parts we need to tie the system together.
  • 6/25 :: Daniel adds : This is what our hood uses and what's nice is that the grease trap pops off and goes right in the dishwasher.

Island Update


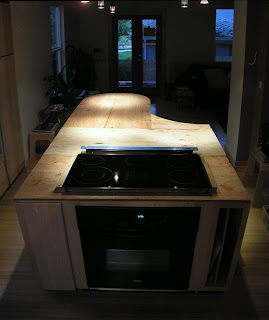
With Nick's help, we got the island layout figured out and got the appliances fitted. The oven is now installed and we've got power through the floor. The base cabinets (there are three of them here, screwed together) holding this tetris-tight knot of appliances and wiring (don't worry, we're not risking fire hazard) required hours upon hours of adjusting, cutting, fastening, re-fitting, more adjusting, and on and on, but things are starting to come together nicely.

Kitchen Progress


Rachael has continued to closely draft kitchen cabinet installation with kithen cabinet stocking. The cabinets have a lot more work ahead, but that hasn't stopped her from moving all of our condiments, cereals, bowls, cups and utensils into any cabinets with working drawers or doors.

The refrigerator, dishwasher, sink, disposal and built-in microwave are installed and (mostly) working.

Slate Down


The hallway and first floor landing slate tile are installed. Rude has been vigilant about not only making sure that the tile install stays on schedule but that it looks amazing, too. Thanks Rude!

Our good friend Nick helped us hang the bathroom door today (and install the garbage disposal and engineer the kitchen island and work his butt off and keep everyone laughing). It's the original door hung in a new frame. Special thanks to Nick, who clocked 13 hours on site today and is returning for more punishment tomorrow.

Tub Hardware


Dean came by today and installed the plumbing fixtures for the clawfoot tub. We're not going to enclose the tub with a curtain or door, and the wall and floor are designed to take on light water loads and shed them through the floor drain under the tub. The hand shower is for rinsing (dirty tub and dirty bodies). In an effort to keep this relatively small bathroom free of clutter we've ended up with a European style bathing station.

Big Flush, Little Flush


Here's a closer look at the flush buttons on the dual-flush toilet in the first floor bathroom.

Another angle of the deck, this one looking down the south stretch to the front entry way. We really like the look of the recessed can light in the porch ceiling.

Deck Fixtures


The outdoor lighting fixtures and bubble cover outdoor wall outlets have been installed on the deck.

640 Feet of Pine


Leaning against the garage is 640 feet of clear sugar pine trim (Pinus lambertiana) conditioned with Benite and then stained. We picked this up through our friends over at Woodcrafters, which is perhaps the finest finish carpentry supply shop in Portland. We chose the sugar pine because it looks good with the bamboo floors and maple cabinets. Something we didn't know when we picked it out is that it's native to Oregon, Washington and Northern California, and was likely harvested locally.

In the foreground, I think Rachael is collecting the nonferrous metal scraps the magnetic broom wouldn't pick up.

This past weekend we got all of the perimeter cabinets in and we got as far as roughing in the base cabinets for the island. None of these cabinets is attached to anything yet. We need to do a lot of measuring, fitting (and even make-believing that we're sitting at the island hanging out, eating dinner or cooking) to figure out what it will take to get this island together.

There are a lot of things to consider:
  • Cooktop, oven and downdraft all have to play into that center base cabinet. It's going to be tight
  • The island should be generally centered on the lights and the room and we need to maximize walking space around it
  • We need to shape the island so that when people are seated at it major traffic through-ways aren't blocked
  • We need to get power through the floor for the cooktop, oven, downdraft and outlets
  • We need to be able to get a 10" diameter downdraft vent through the floor into a very tightly packed basement ceiling (packed with wiring, plumbing, etc), into a remote blower (which will also be attached to the basement ceiling) and then out through an exterior wall
  • We need to make the island functional enough to work and cook on; some space will need to be designated as a prep area since the cooktop is so wide
  • We don't want the island to be so big that it takes over the room
  • We need to add otherwise unnecessary vertical support to the island because the base cabinets aren't strong enough on their own to withstand the weight of the concrete countertop Rude will be installing
Anyway, you get the point. This will turn out to be a drawn-out engineering brouhaha.

Backyard From Above


The deck surface is nearly done and the stairs should be done next week. We're still working on our railing solution, but we'll give you a hint: it's going to be considerably different than the deck railing we did on the last house. Rachael and Hannah have done an amazing job of clearing the yard of debris. It's starting to look a lot bigger than it has in recent months now that building materials are disappearing.

We took photo from the second floor bedroom, facing west.

Sunday, June 17, 2007

Cabinets, decking, yard clean-up, oh my!

Sorry for the pause in posts - Justin's absence meant no new photos, and photos are the big draw. We'll try to have some up by tomorrow.

The last week was busy despite his work trip and Rachael's final week at school. An abbreviated punch-list of what we did:

*Bathroom fixtures were installed. The big flush/little flush toilet is a hit.
*Cabinets are (nearly) done.
*The yard has been cleared thanks in large part to Hannah L-K and her 8 hours of backbreaking labor. She's a workhorse! She was particularily found of the "magnetic broom," which is literarly a large magnet on the end of a stick. She must have picked up 5lbs worth of nails and other assorted metals while combing the perimeter of the house.
*The deck platform is complete.
*Trim was primed for installation next week.
*The unpacking and de-boxing continued.
*1000 lbs worth of scrapwood was hauled off and recycled at Farwest Fibers. They take everything there, from cardboard to carpetpad to clothes.

The week ahead promises big advances as well. We'll be installing stairs and stair-skirting (thanks, Dave), baseboard trim, the last of the interior doors, continuing the tiling of the first floor mudroom/landing and beginning the molds for the counter tops (Rude on both counts), getting windowsills in place, hooking up the appliances and beginning the labor-intensive process of getting rid of the energy and water-sucking grass (more on how we're doing this in a later post.)
  • 6/18 :: Daniel adds : You live in Portland, if you can have grass anywhere, it's there - right? Why not just get some less water intensive varieties?
  • 6/23 :: We add : Because we want to grow other things. Grass produces very little O2, absorbs even less CO2, requires frequent maintenance and does little to counteract the urban heat island problem. Also: We have this park two blocks away, and it includes one of the two regulation bocce courts in the city. We do love exotic grasses and have found a great wholesale vendor of these - those that grow taller and have unique colors or patterns. These will play a large part in our garden.

Tuesday, June 12, 2007

Inside a Box

We moved in this past weekend, shuffling the last box down the block and into the house at about 4AM on Sunday morning.

On Monday Justin left for San Jose for a few days of training, so we probably won't have any new updates until this weekend. Check back on Saturday or Sunday for a barrage of photo and story updates.
  • 6/14 :: Denise adds : Woo-hoo you're moved in. Can't wait to see it. It looks really awesome in the pictures. Congratulations.
  • 6/22 :: We add : Thanks Denise! Living in a construction zone is no picnic, but the excitement of settling in and finding our way around the place offsets the pain a little. :)

Friday, June 8, 2007

(Almost) Move-In Ready


Tonight we finished laying bamboo floors and got the fridge and dishwasher in place. Tim installed a lever and deadbolt on the deck doors. Earlier today Jason, our electrician, did some more trim out electrical on the first floor fans. The drywallers chopped a wire when they were here, so that added a good deal of time to Jason's troubleshooting.

Tim, Carlos and Fernando got some more decking down today but we'll save the photos of the deck for next week when there's more to see. Some of us were experiencing lung irritation yesterday and today, and the jury's out on whether it was due to last night's ammonia leak following an explosion at a nearby cold storage facility, or Ipe sawdust, which Fernando says can be somewhat abrasive.

Tomorrow our good friends Leslie and Kevin are going to help us move our furniture, books, and other odds and ends from the apartment over to the house. The house isn't quite ready for full-on living, but we have a fully functioning bathroom on the second floor, and tomorrow Dean is scheduled up our basement utility sink, dishwasher and washing machine, which will give us the essential plumbing we need for our daily routines.

This photo is taken from the front door. This is what the view from the front door looked like a year ago.

Wednesday, June 6, 2007

Bamboo Floors


Half of our first floor is covered with Easy-Lock bamboo made by Bambo. This is engineered flooring and goes in really easy. The bamboo surface itself is 1/4" thick with standing support ridges and has a green flaky substrate that makes a complete mess when cut.

That's a stack of unboxed bamboo in front of the deck doors. The cardboard in the foreground is a temporary protective cover so the high volume of contractor traffic doesn't thrash the floors.