Thursday, June 28, 2007

Island Layout


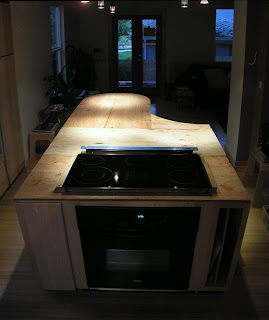
Rude came by yesterday and today to lay out the pattern for the island. We played around with a couple of designs and we've come up with what is turning out to be one heck of a master- slash center-piece in the kitchen. We won't see the results for a few weeks since it takes that long for the concrete to set and cure, but the final product is going to be anything but a drab counter top and we're twitching with excitement about it.

High Spout


Of the many appliances and fixtures, The sink/faucet/garbage disposal is perhaps Rachael's favorite trio! (It may be that she really disliked washing dishes in the bathtub or utility sink...)

This sink is large enough to hold a cookie sheet laying flat, it's chip and scratch proof and is actually really light despite the size (this helped with installation.) We have a mini-Tupperware container that stays in the sink for the occasions when a large sink full of hot soapy water is overkill. (Dad.) The sink will be under mounted beneath the concrete countertops.

The garbage disposal (an "InSinkerator") is a food-waste pulverizing monster, yet completely silent. Well, not COMPLETELY silent. We wanted an appliance that did its job (grind up non-compostable food matter) quietly while still rumbling loudly enough to dissuade adventurous 3 year olds, from trying to save the castoffs of their purple cauliflower.

The amazing faucet sits in such a way that it demands attention. We wanted a tall, largely arched faucet to better enable us to fill pots and pans with water, or to rinse them clean. The water power coming from the faucet is amazing, and a set of buttons lets you alternate between a spray version and the more typical single stream. The head of the faucet pulls down out of the neck on a hidden hose and extends a few feet, allowing for easier access to the distant corners of this seriously gargantuan sink. We chose the faucet not only for the phenomenal function, but for the form as well. It seems to mimic the shape of the necks of the Canadian geese that live across the street in Crystal Springs.

Xenon


These under-cabinet light fixtures have Xenon bulbs, which are both relatively low energy and cast a warmer glow than other low-energy bulbs (such as fluorescent). The bulbs run at line voltage (110v), which means we can put them on dimmers. The conduit connecting the lights is required since exposed romex in a living space is against code, but we'll be able to hide some of it with backsplash and paint. This is a low-angle shot you normally wouldn't have if standing in the kitchen, and you really need to stoop down to to see the fixtures.

Urban Flamingo


This lovely Great Blue Heron perches just outside our bedroom window, about 50 feet up this conifer. Yesterday he stayed well into the day, perhaps content with the knowledge that he was
a. beautiful (the humans at our residence want nothing more than to gawk) and
b. freaking huge! His wingspan must be at least six feet long. This guy could take the raccoon (living in the next tree over, as verified in previous posts) head on. We hope that he doesn't, but instead continues to make his home in direct view of ours.

Herringbone


The main decking, stair treads and riser boards are finally in, and the deck looks gorgeous. Instead of 45-degree miter joints, which we've largely tried to avoid in this entire project since we harbor a semi-extreme dislike of them, we're using a herringbone pattern at all of the deck corners. This has been some tedious work for Green Hammer, not only because it's finish work but because the Ipe ironwood is pretty difficult to work with. We posted about the excellently tough construction properties of Ipe in an earlier post.

Light Commercial


We're using Schlage's S-Series line of light commercial UL-Listed security hardware for all interior doors. The commercial grade stuff isn't any more expensive than the residential door hardware (and less expensive in some cases), and it's going to last much, much longer. We used medium duty commercial grade Trans-Atlantic levers and Schlage deadbolts with reinforced latches and locks on the exterior doors. The lever action on the commercial gear is oh so smooth.

Foot Model Global Winner!


Here Karen is seen striking a pose on our new FLOR. FLOR is basically 20" x 20" segments of carpet that are sold in a variety of textures and colors. They are made of recycled materials and are very durable. You can attach the squares in any formation you'd like, and switch them up as frequently as you please. If one square (our many squares have been stickied together to form a larger carpet) gets dingy, you simply replace it with another. The old one is recycled and the cycle continues. Note to friends: Please aim for the gray square when spilling red wine (cola, prune juice, coffee, whatever...) I fear for the longevity of the lone orange square.

Justin liked my pattern. Very binary, I think he said.

Door Trim


Jason has been visiting us on evenings and weekends, installing cabinets and trim. This past weekend he got through most of the first floor and put trim around most of the door frames. We're going with a pseudo post and lintel style trim cut, which is easier to cut and has a classier look (IOHOs). We finished the trim boards with Benite wood conditioner and then a light stain. The result is a perfect match to the bamboo floors.

This photo is of the first floor bathroom door. The door isn't finished yet since we haven't decided what to do with it, but the bathroom needs privacy. We'll take the door down and refinish it later.

Risers and Skirting


Last weekend our good friend Dave and his business associates Deacon and Bill traveled from Bend to install the bamboo stairs. They discovered that the stair nose wasn't right for our stair treads so were only able to complete the risers (the stair face boards) and skirting (the boards that run alongside the stair). They made fast work of some complex cuts, however. Thanks, guys!

Monday, June 25, 2007

Rachael's First Attempt at Detail Work


Justin and I have had distinct roles in this remodel: He is the detail guy and visionary, I am the grunt labor and accountant. Needless to say, I'm envious of his side of the bargain. The problem is, I simply don't have the skills (yet) to do much of what he does, and a remodel of this scale is not the place to practice. Thus I'm self-regulated to lugging, recycling, cleaning, feeding, managing and the like. I should note that Justin is always most encouraging of me and my attempts to master any new skill.

Above is a shot of my first foray into the realm of detail work. I had a template which was surprisingly unhelpful as the holes were far larger than the drill bit. I still had to choose where in the hole (i.e. upper right quadrant) I was going to drill and draw a dot to guide me. I was, in fact, so hyper-focused in my attempts to get everything just right (as Justin always seems to) that I had forgotten that we'd agreed that we were going to position all of the handles horizontally, and inadvertently drilled the first door holes vertically. It ended up for the better as we realized that the vertical handles on doors (we'll still do horizontal on drawers) allow for maximum opening of the upper cabinets.

The design of the drawer pulls is found in many other areas of our house, notably light fixtures. We chose these as they were both geometric and simple. And on sale.
  • 6/27 :: Daniel adds : We used almost identical pulls in our kitchen - with vertical alignment for the cabinet doors and horizontal for the drawers. I made a template out of a spare piece of 1x4. The best thing to do is to make sure to CLAMP the template down - also, put blue tape on the cabinet door back (always drill front to back) to keep the drill bit from splintering the back of your cabinets.
  • 6/28 :: Hannah adds : i'm so proud of you!

Friday, June 22, 2007

Engineering Marvel


Here's the nearly completed modified downdraft blower. It started out a rectangular box. After marking, cutting, snipping, bending, drilling, riveting and screwing, it's now a cube.

Pop Rivet


Nick pops a rivet into the (extremely) modified housing of the remote blower for the kitchen cooktop downdraft unit. The downdraft and blower are two separate appliances connected together by ductwork. The downdraft is installed behind the cooktop and is flush with the countertop when it's turned off. When it's on, it'll come up out of the counter to a height of about 7 inches. The remote blower will activate simultaneously and pull 800 cubic feet of air per minute across the top of the cooktop, through the downdraft and ductwork and out of the house, keeping grease off the ceiling and rapidly evacuating steam and smoke from the first floor airspace.

We'll mount the blower remotely on the ceiling of the basement (about 7 feet of duct downline from the downdraft). That it's a remote unit means that it's in another room downstairs and we won't have to listen to a noisy fan in the kitchen. The blower suction is a squirrel cage design (as opposed to a bladed fan normally used in overhead vents), making it very quiet.

The blower was originally about the size of a window-fitted air conditioner, and shipped too large to conveniently fit anywhere in the basement utility room without creating a huge and unsightly obstacle. A lot of engineering went into cutting down the walls by a few inches so that it will fit into the bay between our basement ceiling joists, getting it up out of the way. Thanks Nick for your hands-on help and science (and for helping void the warranty, even though it should be extended). Thanks Bo for the tool loan, and thanks to the guys at Do It Yourself Heating for all the wacky duct parts we need to tie the system together.
  • 6/25 :: Daniel adds : This is what our hood uses and what's nice is that the grease trap pops off and goes right in the dishwasher.

Island Update


With Nick's help, we got the island layout figured out and got the appliances fitted. The oven is now installed and we've got power through the floor. The base cabinets (there are three of them here, screwed together) holding this tetris-tight knot of appliances and wiring (don't worry, we're not risking fire hazard) required hours upon hours of adjusting, cutting, fastening, re-fitting, more adjusting, and on and on, but things are starting to come together nicely.

Kitchen Progress


Rachael has continued to closely draft kitchen cabinet installation with kithen cabinet stocking. The cabinets have a lot more work ahead, but that hasn't stopped her from moving all of our condiments, cereals, bowls, cups and utensils into any cabinets with working drawers or doors.

The refrigerator, dishwasher, sink, disposal and built-in microwave are installed and (mostly) working.

Slate Down


The hallway and first floor landing slate tile are installed. Rude has been vigilant about not only making sure that the tile install stays on schedule but that it looks amazing, too. Thanks Rude!

Our good friend Nick helped us hang the bathroom door today (and install the garbage disposal and engineer the kitchen island and work his butt off and keep everyone laughing). It's the original door hung in a new frame. Special thanks to Nick, who clocked 13 hours on site today and is returning for more punishment tomorrow.

Tub Hardware


Dean came by today and installed the plumbing fixtures for the clawfoot tub. We're not going to enclose the tub with a curtain or door, and the wall and floor are designed to take on light water loads and shed them through the floor drain under the tub. The hand shower is for rinsing (dirty tub and dirty bodies). In an effort to keep this relatively small bathroom free of clutter we've ended up with a European style bathing station.

Big Flush, Little Flush


Here's a closer look at the flush buttons on the dual-flush toilet in the first floor bathroom.

Another angle of the deck, this one looking down the south stretch to the front entry way. We really like the look of the recessed can light in the porch ceiling.

Deck Fixtures


The outdoor lighting fixtures and bubble cover outdoor wall outlets have been installed on the deck.

640 Feet of Pine


Leaning against the garage is 640 feet of clear sugar pine trim (Pinus lambertiana) conditioned with Benite and then stained. We picked this up through our friends over at Woodcrafters, which is perhaps the finest finish carpentry supply shop in Portland. We chose the sugar pine because it looks good with the bamboo floors and maple cabinets. Something we didn't know when we picked it out is that it's native to Oregon, Washington and Northern California, and was likely harvested locally.

In the foreground, I think Rachael is collecting the nonferrous metal scraps the magnetic broom wouldn't pick up.

This past weekend we got all of the perimeter cabinets in and we got as far as roughing in the base cabinets for the island. None of these cabinets is attached to anything yet. We need to do a lot of measuring, fitting (and even make-believing that we're sitting at the island hanging out, eating dinner or cooking) to figure out what it will take to get this island together.

There are a lot of things to consider:
  • Cooktop, oven and downdraft all have to play into that center base cabinet. It's going to be tight
  • The island should be generally centered on the lights and the room and we need to maximize walking space around it
  • We need to shape the island so that when people are seated at it major traffic through-ways aren't blocked
  • We need to get power through the floor for the cooktop, oven, downdraft and outlets
  • We need to be able to get a 10" diameter downdraft vent through the floor into a very tightly packed basement ceiling (packed with wiring, plumbing, etc), into a remote blower (which will also be attached to the basement ceiling) and then out through an exterior wall
  • We need to make the island functional enough to work and cook on; some space will need to be designated as a prep area since the cooktop is so wide
  • We don't want the island to be so big that it takes over the room
  • We need to add otherwise unnecessary vertical support to the island because the base cabinets aren't strong enough on their own to withstand the weight of the concrete countertop Rude will be installing
Anyway, you get the point. This will turn out to be a drawn-out engineering brouhaha.

Backyard From Above


The deck surface is nearly done and the stairs should be done next week. We're still working on our railing solution, but we'll give you a hint: it's going to be considerably different than the deck railing we did on the last house. Rachael and Hannah have done an amazing job of clearing the yard of debris. It's starting to look a lot bigger than it has in recent months now that building materials are disappearing.

We took photo from the second floor bedroom, facing west.

Sunday, June 17, 2007

Cabinets, decking, yard clean-up, oh my!

Sorry for the pause in posts - Justin's absence meant no new photos, and photos are the big draw. We'll try to have some up by tomorrow.

The last week was busy despite his work trip and Rachael's final week at school. An abbreviated punch-list of what we did:

*Bathroom fixtures were installed. The big flush/little flush toilet is a hit.
*Cabinets are (nearly) done.
*The yard has been cleared thanks in large part to Hannah L-K and her 8 hours of backbreaking labor. She's a workhorse! She was particularily found of the "magnetic broom," which is literarly a large magnet on the end of a stick. She must have picked up 5lbs worth of nails and other assorted metals while combing the perimeter of the house.
*The deck platform is complete.
*Trim was primed for installation next week.
*The unpacking and de-boxing continued.
*1000 lbs worth of scrapwood was hauled off and recycled at Farwest Fibers. They take everything there, from cardboard to carpetpad to clothes.

The week ahead promises big advances as well. We'll be installing stairs and stair-skirting (thanks, Dave), baseboard trim, the last of the interior doors, continuing the tiling of the first floor mudroom/landing and beginning the molds for the counter tops (Rude on both counts), getting windowsills in place, hooking up the appliances and beginning the labor-intensive process of getting rid of the energy and water-sucking grass (more on how we're doing this in a later post.)
  • 6/18 :: Daniel adds : You live in Portland, if you can have grass anywhere, it's there - right? Why not just get some less water intensive varieties?
  • 6/23 :: We add : Because we want to grow other things. Grass produces very little O2, absorbs even less CO2, requires frequent maintenance and does little to counteract the urban heat island problem. Also: We have this park two blocks away, and it includes one of the two regulation bocce courts in the city. We do love exotic grasses and have found a great wholesale vendor of these - those that grow taller and have unique colors or patterns. These will play a large part in our garden.
Tuesday, June 12, 2007

Inside a Box

We moved in this past weekend, shuffling the last box down the block and into the house at about 4AM on Sunday morning.

On Monday Justin left for San Jose for a few days of training, so we probably won't have any new updates until this weekend. Check back on Saturday or Sunday for a barrage of photo and story updates.
  • 6/14 :: Denise adds : Woo-hoo you're moved in. Can't wait to see it. It looks really awesome in the pictures. Congratulations.
  • 6/22 :: We add : Thanks Denise! Living in a construction zone is no picnic, but the excitement of settling in and finding our way around the place offsets the pain a little. :)

Friday, June 8, 2007

(Almost) Move-In Ready


Tonight we finished laying bamboo floors and got the fridge and dishwasher in place. Tim installed a lever and deadbolt on the deck doors. Earlier today Jason, our electrician, did some more trim out electrical on the first floor fans. The drywallers chopped a wire when they were here, so that added a good deal of time to Jason's troubleshooting.

Tim, Carlos and Fernando got some more decking down today but we'll save the photos of the deck for next week when there's more to see. Some of us were experiencing lung irritation yesterday and today, and the jury's out on whether it was due to last night's ammonia leak following an explosion at a nearby cold storage facility, or Ipe sawdust, which Fernando says can be somewhat abrasive.

Tomorrow our good friends Leslie and Kevin are going to help us move our furniture, books, and other odds and ends from the apartment over to the house. The house isn't quite ready for full-on living, but we have a fully functioning bathroom on the second floor, and tomorrow Dean is scheduled up our basement utility sink, dishwasher and washing machine, which will give us the essential plumbing we need for our daily routines.

This photo is taken from the front door. This is what the view from the front door looked like a year ago.

Wednesday, June 6, 2007

Bamboo Floors


Half of our first floor is covered with Easy-Lock bamboo made by Bambo. This is engineered flooring and goes in really easy. The bamboo surface itself is 1/4" thick with standing support ridges and has a green flaky substrate that makes a complete mess when cut.

That's a stack of unboxed bamboo in front of the deck doors. The cardboard in the foreground is a temporary protective cover so the high volume of contractor traffic doesn't thrash the floors.

Circley Square


Carlos and Tim spent some of yesterday finishing soffit for the front porch. It's now starting to look like finished construction; the porch is just about done save for metal roofing, railings and decking.

That's Dave in the photo. He spent all day with us yesterday laying bamboo flooring in the living room. Dave and Cynthia both have been a huge support for us and we can't thank them enough for their generosity.

The title of the post is somewhat literally inspired by the circle-shaped cutout for the can light and the square support framing in the soffit. In thinking of the circle and square, we took a line out of an absurd music video called Hands Are Bananas.

Subway Tile


These wall field tiles are 3" x 6" and are sometimes called subway tiles, presumably because you find tiles this size and shape in subways all over the world. These particular tiles are handmade and are about 3/8" thick. We picked them up at Dal-Tile here in Portland.

This wall will have tile running all the way to the ceiling since this is the corner into which we'll place the clawfoot tub.

Rear Deck Framed


Yesterday Michael and Jeff were back on site and they finished pulling the deck framing and stair stringers for the rear entry deck and front porch. The lower deck in this photo is the "recycling bench" on which we'll store our recycling and trash bins. The lowered deck makes it easy to toss things in from the back door and to move them on and off the deck to get them down to the end of the driveway for collection day.

Monday, June 4, 2007

Wood Underlayment


This 10 mm thick black rubber pad is our under-bamboo soundproofing. It's also from Sound Isolation Company. Wood floor soundproofing requires different materials and since our subfloors are ply wood and not concrete, we need a thicker pad than someone might use in a new high-rise condo. The pad is made from 93% post-consumer waste like as tires and old dodge balls. It's extremely heavy. One 4' x 25' roll weighs over 200 pounds, and we'll use close to 5 rolls. That's half a ton of soundproofing on our kitchen and living room floors.

Thanks to Matty Cat for lending us his heft this evening. Matt and Justin lugged these things up unfinished deck stairs and it was precarious, if not somewhat dangerous moving the behemoth rolls of rubber. We'd also like to thank Matt for his help a few weeks ago hanging insulation in the basement bedroom ceiling. (That too, was a soundproofing project.) Matt and Karen have been a huge support to us through this project and we'd be filling our milk with tears without them.

Fresh Tile No Traffic Until Tues Thanks


Today, Rude (pronounced "Rudy" for those calling him "rude," which he rarely is) planned and set the bathroom floor tile in place. We're using 3/8" thick Brazilian Black Slate which appears to be considerably strong given that it's stone, not ceramic. Rude tells us that stone tile normally ships in thicker grades.

The fuchsia wall coating is a waterproofing membrane that goes on a bit like liquid plastic. Once it's dry, it'll form a watertight barrier behind the tile. Water that does get behind the tile will run down to the floor tile and, with luck, either evaporate away or evacuate the room through the floor drain.

Tile Underlayment


Yesterday and today we've spent some time installing a layer of sound isolation barrier, which goes on top of the subfloor and beneath the finished floor. Since we have living space in the basement, we're hoping to keep noise isolated in each space. In the ceilings on the first floor we used spray foam insulation to keep noise from going through the ceiling into the upstairs bedroom. Given the foot traffic we'll have on the first floor, we are adding the additional layers of underfloor material.

For tile we're using a 3 mm thick styrofoam-like composite material with an adhesive backing, made by Sound Isolation Company. Our good friend Rude (of Portland Cement Co. and who's laying our tile and pouring our countertops) tells us that this stuff is great to work on and that it takes thin set (the mortar mix used to hold tile in place) as well as Wonderboard does.

Saturday, June 2, 2007

Frosty Glow


This is a fluorescent wall sconce in the stairwell on the landing between the first floor and basement.

Kitchen Paint


The kitchen alcove and bump out are brown and we extended the white of the ceiling onto selected sections of wall here and in the living room. The white in between the sections of color adds a lot more interest to the room and brings out the varied geometry of the walls.

Living Room Paint


The living room has gone from all walls orange to one wall orange. Last night Chano and Leo finished the first coat of orange on the whole living room and when Rachael and I saw it, we simply didn't like the way it abutted the brown walls in the kitchen. So we scaled it back a little and went with a white living room and a single orange accent wall, which we like a lot more.